
It has happened to all of us at one point or another: You click “update” on your live site’s plugins…and then the screen goes white. You did not touch any code; all you did was click one button! Way to go. You killed your WordPress website.
If it is that easy to break your website without touching code, imagine how dangerous it could be to use the built-in editor on your theme or plugins or edit code directly through File Transfer Protocol (FTP). You should probably avoid it at all costs.
While we recommend using expert WordPress support and maintenance services to make changes to your site, we recognize that it’s also beneficial to understand the lay of the land yourself. Most importantly? Whether you are editing custom code on your site or even just updating plugins, if you want to ensure everything will work properly, you must test everything in a staging or development version of your website first.
If you want to be able to maintain WordPress sites and build them out, the first step is learning the background. So, here’s how to do it – and do it right:
The Easy Way
Most of the modern managed WordPress hosts out there today, like WPEngine, WPMaintain, and Pressable, offer one-click staging environments. From your WordPress dashboard or hosting account, you can simply click a button, and they will auto-magically copy your live site and create a sandbox environment where you can test your code/updates without the fear of breaking anything too important.

Doing It Manually
Sometimes, due to custom requirements, price, or any number of reasons, using a managed WordPress host is not for you, which means you (typically) do not have a single button to create staging sites for you. The good news is that it is still not that hard!
At the lowest level, a staging site is nothing more than a copy of your current website. The most common route taken to create this copy of your live site is to set up a “staging” subdomain. For example, if we were to use SiteCare.com, we may want to use something like staging.sitecare.com (and don’t worry–our staging site is located elsewhere!). Depending on your host, the process to set up a subdomain may vary; what you ultimately want to achieve is to have a WordPress site available at that subdomain.
Now that WordPress is running, the fun comes in duplicating your site as it currently sits, which requires copying the files in your wp-content directory and then your database. The simplest (but maybe not the fastest) way to start this is to download a copy of your live site’s wp-content folder via FTP and then upload it again to your staging site’s wp-content folder. All your plugins, themes, and uploads will be copied doing this. There are faster methods if you are familiar with the command line and have those tools, and if you have those tools, you probably already know how to do it!
The database is another thing altogether. Unlike the wp-content folder, you cannot simply copy this over because of the links to the live site throughout your database. These need to be rewritten to point to your staging site, or you may run into issues.
WP Migrate Pro
A plugin we regularly use here at SiteCare is WP Migrate Pro, which, once installed (on both sites), will handle copying the database between sites as easily as it gets–simply the push of a button.
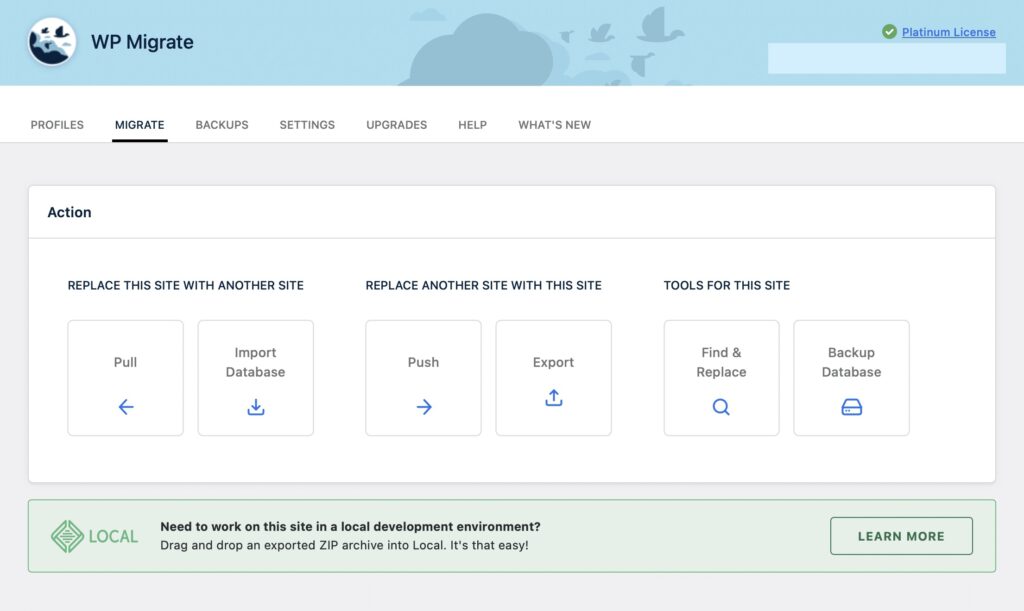
While copying the database, it will also rewrite all your paths and URLs from one site to the other, making your life much easier. This is a premium plugin, which means it does have a cost associated with it ($49 for 1 install), but take a moment to think how much time it will save you and decide if that time is worth the expense.
If that is not an option for you, though, another way to copy the database is to export your SQL file from one database and import it into the other, then manually fix your URLs.
We recommend using Better Search Replace (a free plugin built by the same team) or WP-CLI, a powerful command line tool to import, export, and perform search and replace.
Once your wp-content directories and databases are synced up, you now have a functioning copy of your site! You can now log in and test to your heart’s content. If something gets too out of whack, all you have to do is sync up your files and database again.
Securing Your Staging Site
If your staging site is on a publicly available subdomain, you may want to secure it so that only registered users can access it. While there are several ways to do this, one of the easiest ways is installing a plugin like Restricted Site Access; it will require a password to access the site. This will help keep the site away from prying eyes (and Google’s spiders).
Other Alternatives
I recommend putting your staging site on the same server as your website. That way, the hosting environment is almost exactly the same. There are some cases where you may test code locally to find that it works, but it ends up breaking your live site anyway–and that is exactly what we want to avoid!
If you still do not want to set up a subdomain, you could also run a copy of your site on your local computer. A simple way is to use free software such as Local, which makes it extremely easy to run WordPress locally using their auto installer. Just install and follow your onscreen instructions for installing WordPress. Other options exist, but we recommend Local because it works well AND supports Mac, Windows, and Linux.
Congratulations! You Have a Functioning Staging Site.
You’re like a true professional.
Next time you go to upgrade that plugin on your site, try testing the updates on your staging site first to make sure everything works. While this is useful for everyone, it’s especially important for those who have sites that are integral to their income.
Now, as you’re playing around on the staging site, even if something does break, you will never again open a frantic WordPress maintenance support ticket because your website is down. Instead, you will be cool, calm, and collected and can find the solution at your leisure while all your friends rip their hair out with a downed website. Although, if you are nervous, our WP maintenance services will get you out of a sticky situation.
Feel free to contact SiteCare with any questions you have about WordPress migrations, backups, or staging sites; our WordPress support and maintenance services are here to help. If you’re looking for WordPress hosting and maintenance services to take your website to the next level, speak to one of our team today.


Leave a Reply